Around the same time I was craving the apple cider from the previous recipe, I also wanted gingerbread. The traditional kind. Not the store bought commercial stuff. I found this recipe in Darina Allen’s “Irish Traditional Cooking”. Of course I swapped some items, doubled the amount of powdered ginger and added some of my own homegrown grated fresh ginger. I hope you enjoy this loaf. It is so good on a cold day with tea or coffee.
2 Tbsp Milk
½ Tsp Baking Soda
1 oz Golden Raisins (I used Black Currents)
2 ozs preserved Ginger in syrup (I used the Spice World sweetened ginger in the squeeze bottle)
1 oz dried candied Ginger, small chop
2 thumb sized knobs of fresh Ginger, grated
½ c Butter, room temp
½ c and 1 Tbsp of Dark Brown Sugar
2 Eggs
8 fluid ozs Molasses (I used Black Strap)
1 ¾ c AP Flour
2 Tsps powdered Ginger
1 oz Raisins (Black Currents)
Pre-heat oven to 325 degrees F.
Warm the milk and baking soda to 110 degrees F. Add the golden raisins/black currents, preserved ginger, candied ginger and fresh ginger to the milk. Set aside.
In the bowl of a stand mixer, cream the butter. Add the sugar and beat until light and fluffy. Add eggs, one at a time. Mix in the molasses and fruit/milk mixture. Mix until incorporated. Then add the flour, powdered ginger and remaining raisins/black currents.
Line a large loaf pan with parchment paper. Pour the mixture into the loaf pan. This batter should have an awesome raise while baking but it will cave in the middle while cooling. Bake at 325 degrees F for 1 to 1 ½ hours. Cool on wire rack. It keeps well in a tin.
So, it was a gorgeous day today on my homestead. I spent the afternoon gathering up dead twigs and Sweetie Annie stalks that was killed by our first freeze last week. I burned them a little at a time in my fire pit. All of the grass is dry and brown so I have to be extra cautious right now. No one wants to deal with a grass fire!
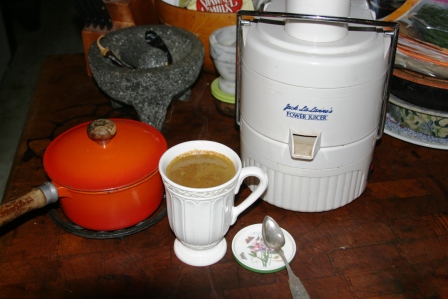
As the afternoon turned into dusk, I really craved some apple cider. I had none in my pantry. If you have followed my blog for any time (I THANK YOU!) you probably know it’s 22 miles one way into town. So a road trip was not going to happen. Then I remembered I still had about two pounds of Gala apples from the boxes of culled produce I was gifted last week.
Out came my trusty Jack Lalaine Power Juicer! That beast is 22 years old. I bought it back in that un-named Northeast state in 2005. It has served me well and has done yeoman’s work. I don’t juice regularly anymore because I have been doing keto/carnivore. But this time of year is the exception. The weather is getting cooler. The trees have that Fall color. You just need apple cider when you sit around a fire.
Now I know not everyone is a fan of pumpkin spice. I understand. It has been way over done and over the top at some coffee shops that I will leave nameless. Mostly, those phoof phoof drinks are all sugar. Anyway I hope you enjoy this. It is so tasty when warmed.
Approximately 2 pounds tart Apples, don’t peel, just quarter. Process them through your juicer. Put the apple juice in a small pot and bring to a boil. Reduce to a simmer. Add about one teaspoon of the pumpkin spice to the juice. Do a taste test to see if it suits your fancy. Add more accordingly. Simmer for about 10 minutes. You can strain the cider through a fine metal strainer if desired. Sometimes the cider may be a little gritty. Enjoy!
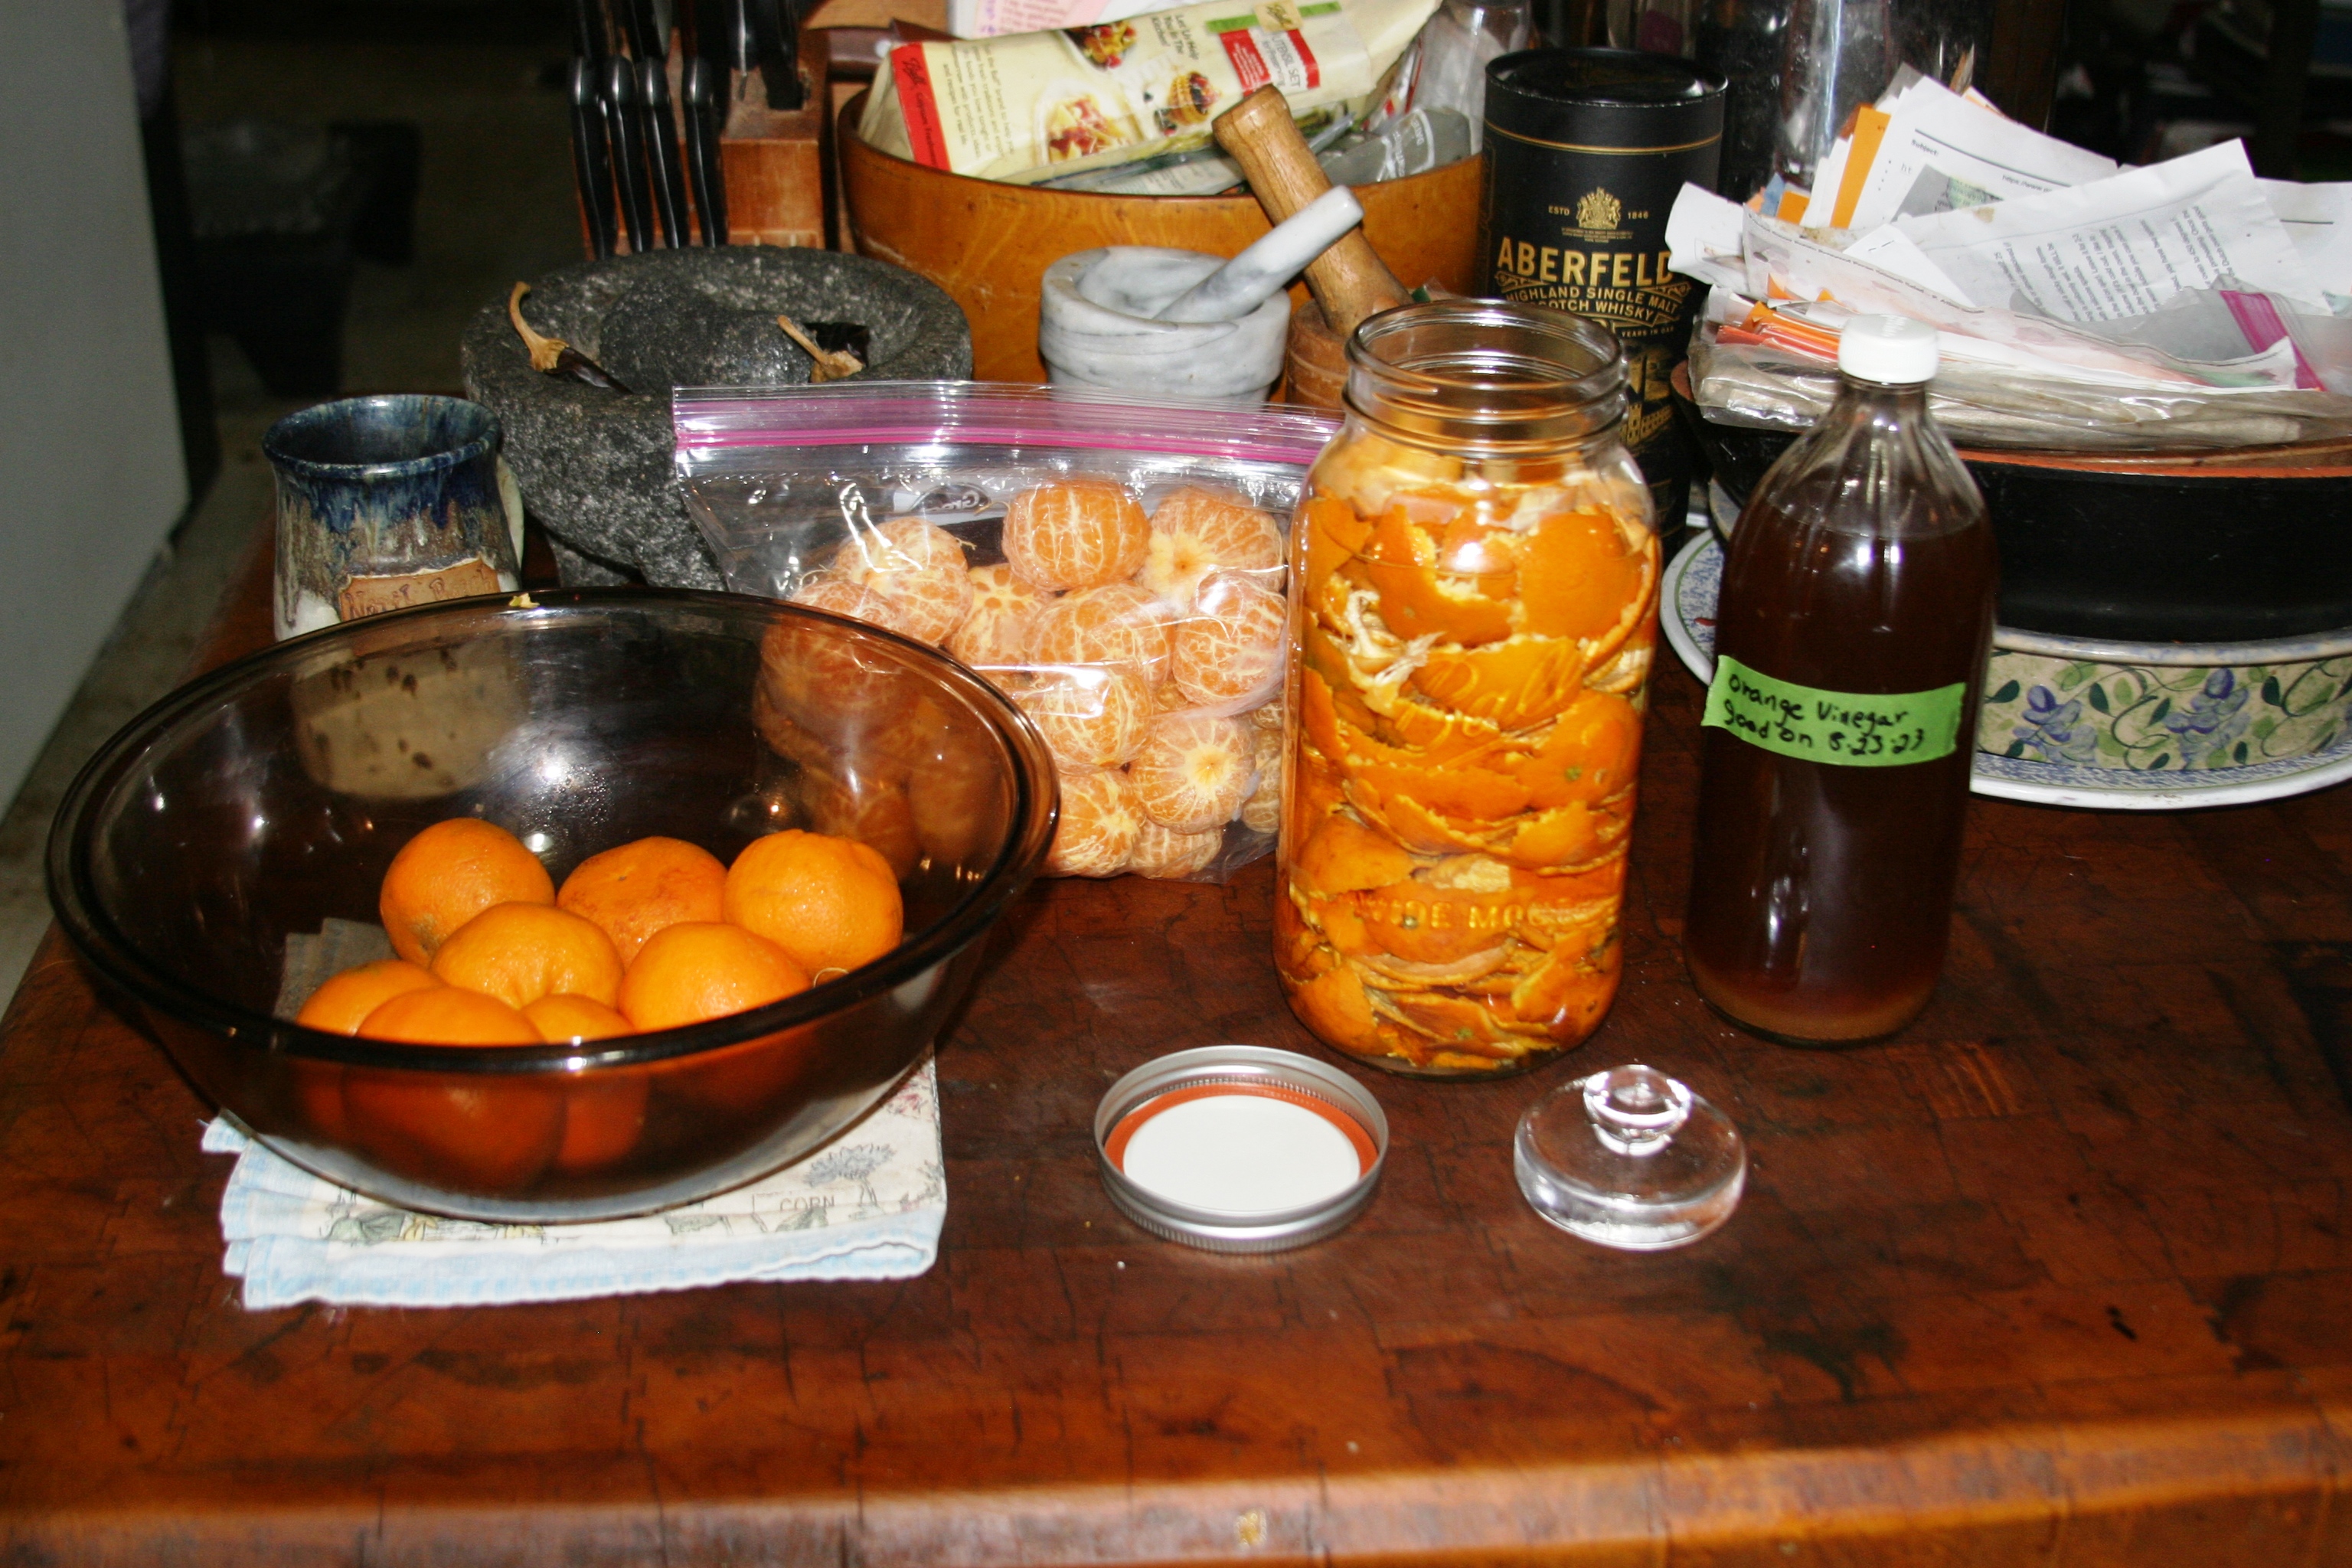
Yesterday while I was in town on errands, I was blessed with two boxes of culled produce from the locally owned grocery store. The boxes included two 3 pound bags of mandarin oranges, two bags of green grapes, a bag of romaine hearts, several bagged salads, peaches and a head of iceberg lettuce. I removed the grapes from the stems and had two gallon baggies to freeze. I love oranges but six pounds of them would be a bit much to consume. I decided to make another batch of orange peel vinegar. I made a batch in the spring and I do need more. I didn’t include in the photo was a batch of lime vinegar I was making. I use a glass fermenting weight in the mason jar to hold the peels under the top of the liquid. The remaining peels will be dehydrated then ground into orange peel zest. I am freezing the orange segments. Hat tip to @Pinball Preparedness channel on Youtube for the recipe! Any fruit or herb can be made in homemade vinegar. This is a link to Pinball’s video. https://www.youtube.com/watch?v=mFjt0O2BOw0
I used a half gallon wide mouth mason jar. Fill the jar ¾’s full with the orange peels. Add ¼ cup of sugar. Ideally, I use pure cane sugar since it is not GMO but if you have beet sugar that will work also. Fill the jar with filtered water (I use my Berkey water.) until the peels are covered. Put the lid on an shake to dissolve the sugar. Remove the lid. I use a glass fermenting weight to keep the peels under water. Cover the top of the jar with a paper towel, coffee filter, cheesecloth or pieces of an old clean tee shirt and secure with a rubber band. I like to use the tee shirt pieces because any fruit flies that may gather cannot get into the jar. Place on the kitchen counter and stir everyday with a chopstick or a wooden BBQ skewer for two weeks.
After two weeks strain out the peels and put liquid into a different jar. Cover with an appropriate lid and place in a dark cool place for six weeks. This vinegar is awesome in salads!
There are so many uses for vinegar around the home and homestead. Books have been written about them. In fact I have a small book printed in 2008 and titled “Over 100 Helpful Household Hints that use Heinz Vinegar”. Here are some for the homestead. To kill fire ants use a 1 to 1 ratio of water and vinegar. To kill weeds use one gallon of vinegar, 1 cup of salt, 2 tablespoons of Dawn dish soap. Vinegar will take rust off tools. Vinegar will clean stains off clay garden pots. To acidify garden soil you can use 1 gallon of water to 1 cup vinegar.
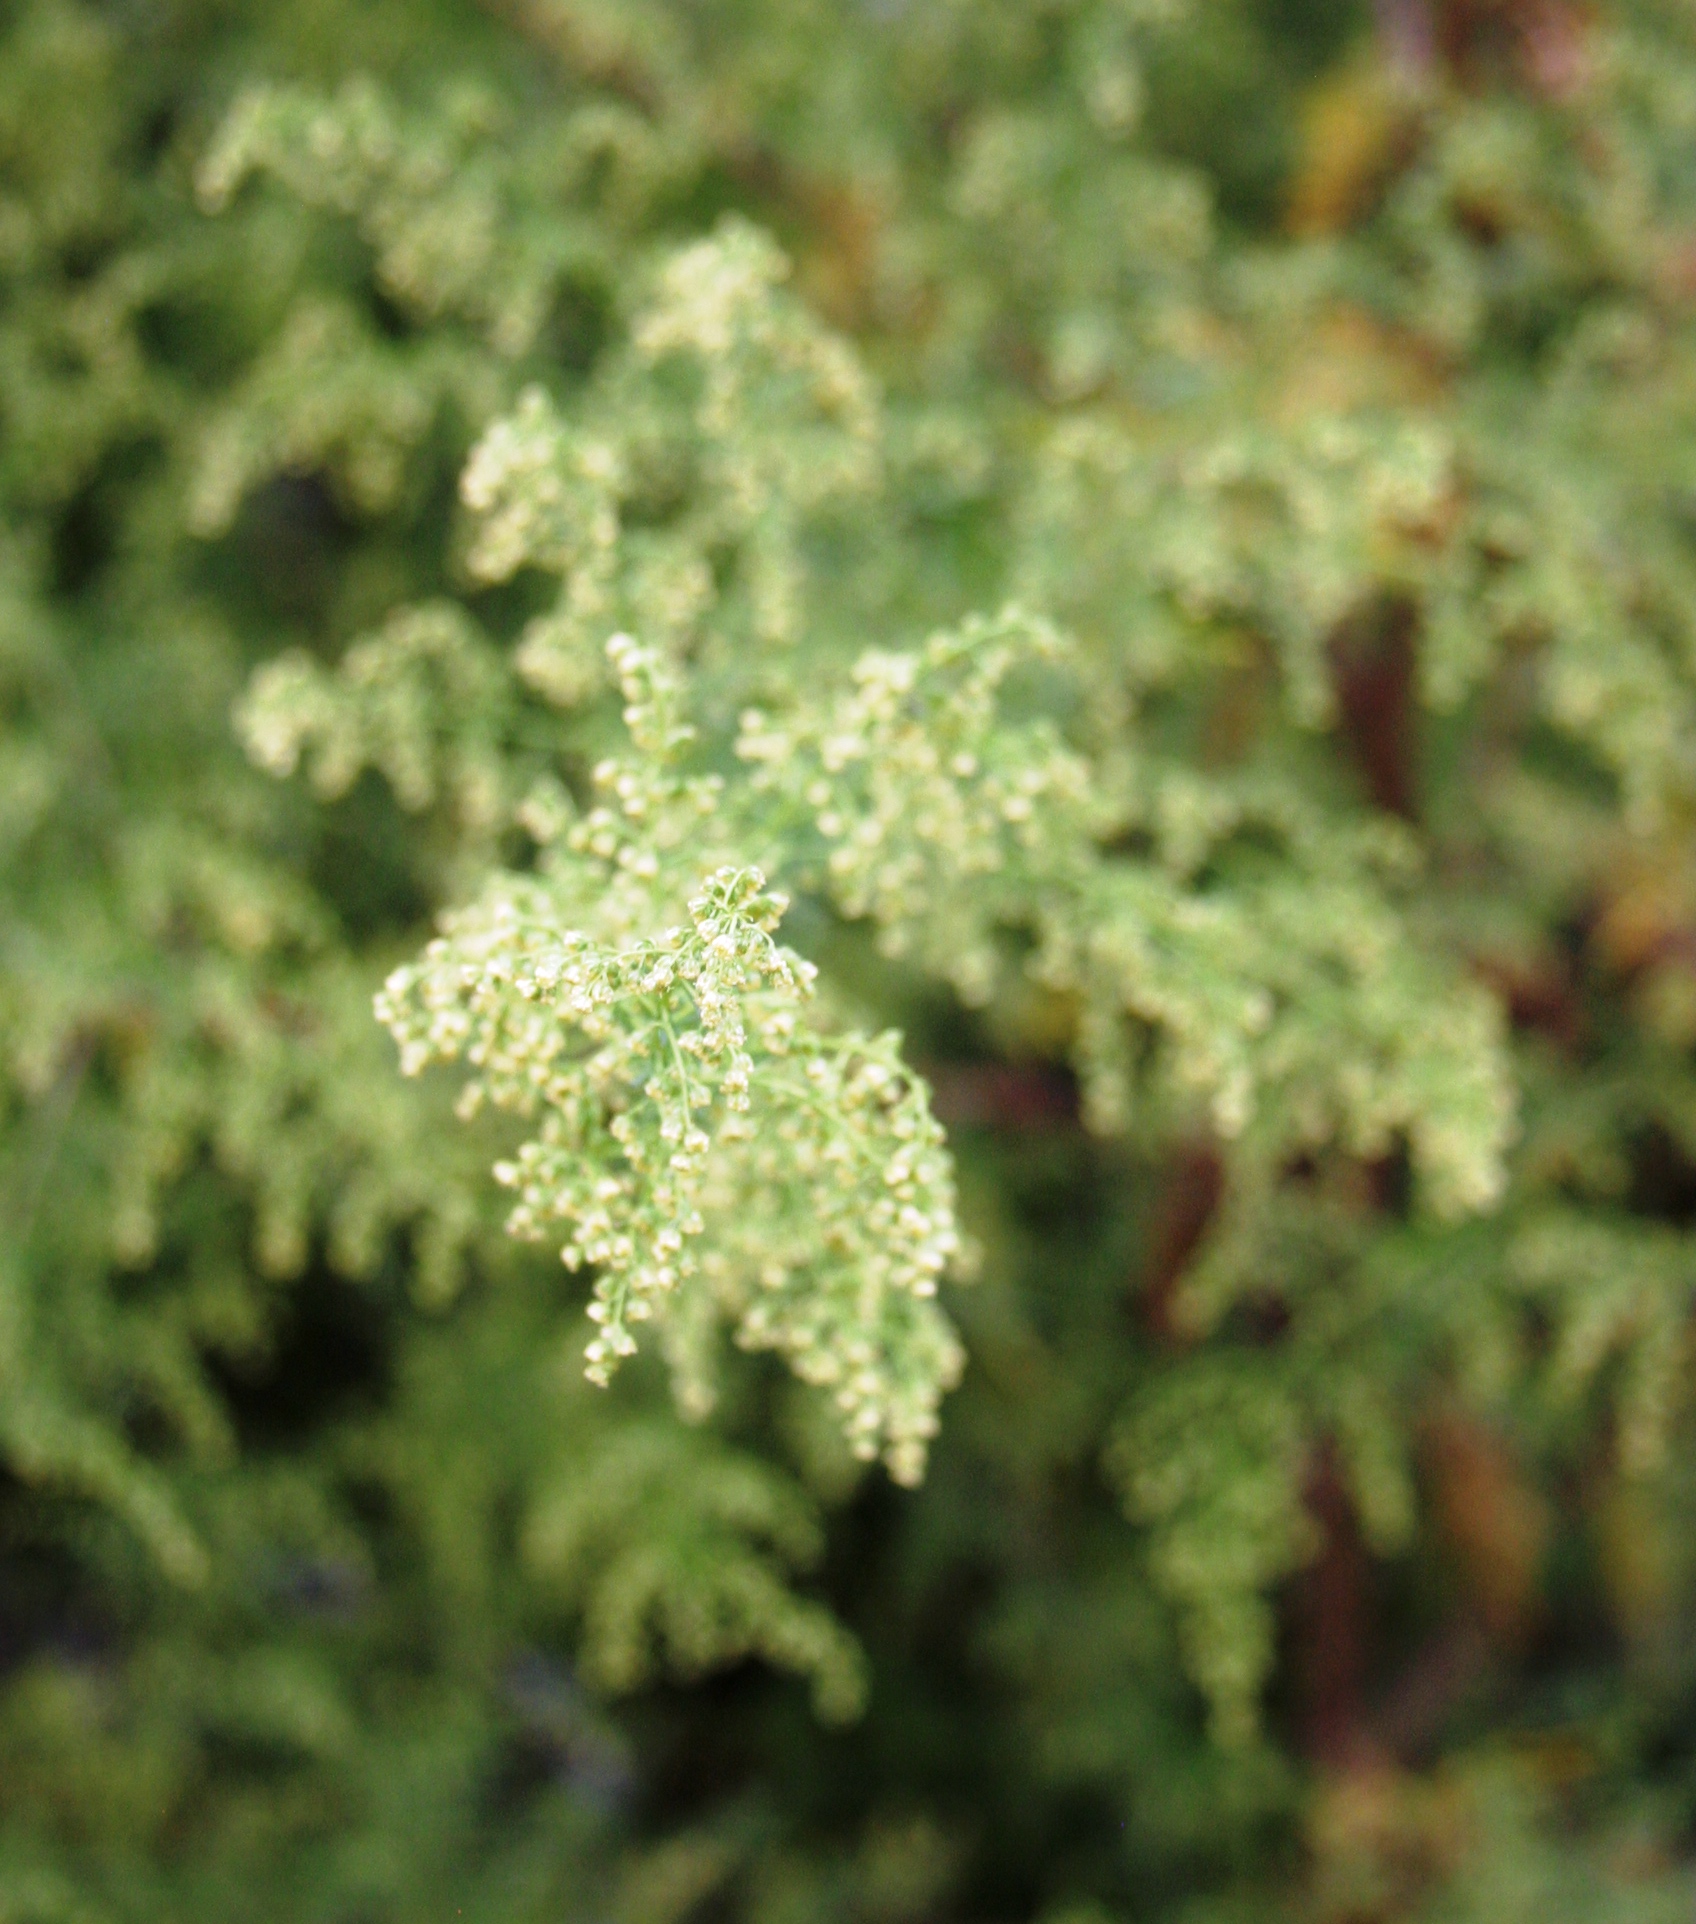
This is sweet annie on the side of my house. Possum, one of the outdoor cats, is keeping his eye on me. Several years ago I traveled back to that Northeast state where I was born.. When I was living there (before my move westward ho) I had a nice herb garden culinary and medicinal. One of my prized plants was sweet annie. The scent of it is intoxicating. A friend was able to find several sweet annie plants for me. I bought them back to Oklahoma. Now five years later, the plants are growing like a weed in my yard and pastures.
THE DISCLAIMER: The following is not to be considered “Medical Advice”. The author is not a “Medical Doctor” or “Health Care Professional”. Any use of this information is solely the responsibility of the Reader. (Words in quotations are legal words used by the US Federal Government.)
Okay enough of the blah, blah, blah. Back to the good stuff.
Botanical Name
Artemisia annua
Common Name
Sweet Annie, sweet wormwood
Plant Type
Annual
Mature Size
6 ft. tall, 2ft. wide
Sun Exposure
Full
Soil Type
Sandy, Well-drained
Soil pH
Neutral, Alkaline
Bloom Time
Summer
Flower Color
Yellow
Hardiness Zones
5-9, USA
Native Area
Europe, Asia
Sweet annie/sweet wormwood (Artemisia annua) should not be confused with its cousin wormwood (Artemisia absinthium) made famous because of the French liqueur absinthe. Loved by Toulouse-Lautrec, Vincent Van Gogh, Picasso and others, absinthe was addictive and toxic. Sweet annie has some of the same biological components but does not contain the toxic compounds. One of its active compounds artemisinin has been used in treating malaria.
Known in Traditional Chinese Medicine (TCM) as qing hao, sweet annie has been used to treat malaria and intestinal parasites. According to Dr. James A Duke sweet annie has been proven useful in China and at the Walter Reed Army Research Institute in Washington D.C. to treat a malarial parasite similar to the amoeba. Dr. Duke suggests using two to five teaspoons of the dried leaves to make a tea and drinking one to three a day.
Sweet Annie can also be used as a tincture. When I make a tincture I gather the lacy leaves and yellow flowers starting in September. Right now is ideal. I fill a half gallon mason jar with the plant material and fill with 100 proof vodka. Label, label, label the jar. Did I say label the jar. Yes! You might recognize the plant matter but you won’t remember when you set it aside. Information to include on the label is what plant, what the liquid is and at least the date you bottled. I also include what date it will be able to use. That is usually four to six weeks in the future. Place the jar in a dark spot. When it is ready, strain the plant matter out and label again in a different bottle. Chris Marano, a Master Herbalist who owns Clearpath Herbals in Massachusetts, suggests 10-30 drops 1-3X daily and a higher dose if addressing parasites.
During the recent disease crises I used my sweet annie tincture and was never sick. I didn’t even get a cold. I know people will say but that’s just anecdotal. Yes, but it’s my antidote. (Spelling intentional.) I have been known to put a shot of the tincture into my bourbon and seltzer.
Artemisinin also has anti-fungal and anti-viral properties. I believe there is research into treating hepatitis B and C, influenza and other viral infections. Sweet annie has also been studied in treating Lyme Disease.
Genesis 1:29 – And Elohim said, “See, I have given you every plant that yields seed which is on the face of all the earth and every tree whose fruit yields seed, to you for food.
It is getting less hot here in Oklahoma. I don’t want t say cool because it is still in the low 80s. Cool is 60s during the day. For the past several months I have been canning various vegetables that I grew. The last batch I canned was green tomato pie filling. It’s here on the blog. Link: https://reddirtcooking.com/2011/08/09/green-tomato-mince-filling/
While that was cooking the scent of warm Autumn spices filled my house. Now I want pumpkin, persimmon, apple etc. I got a craving for Shoo Fly pie. Some cooks put raisins in the mix but I like the plain style. This pie has two parts, a liquid part and the dry crumb part.
The recipe I used is from “Mennonite Community Cookbook” by Mary Emma Showalter. This cookbook was first printed in 1950. My copy was my mom’s and it is from 1975. Good memories.
Pie shell for 1 crust 9” pie plate
Liquid part –
1 C Dark Molasses
¾ C boiling Water
½ Tsp Baking Soda
Crumb part –
1 ½ C All Purpose Flour
¼ C Shortening or Butter
½ C Dark Brown Sugar
½ Tsp Cinnamon
Preheat oven to 350 degrees. Place pie crust into a shallow pie dish.
Dissolve baking soda in the hot water and add molasses. Stir to combine.
Combine sugar, flour and cinnamon. Rub or cut in shortening or butter to make loose crumbs.
Pour one-third of the liquid into the pie shell. Add one-third of the crumb mixture.
Continue alternate layers finishing with a crumb top.
Bake for 35 to 40 minutes. This will be a very loose wet bottom pie. Great with ice cream!
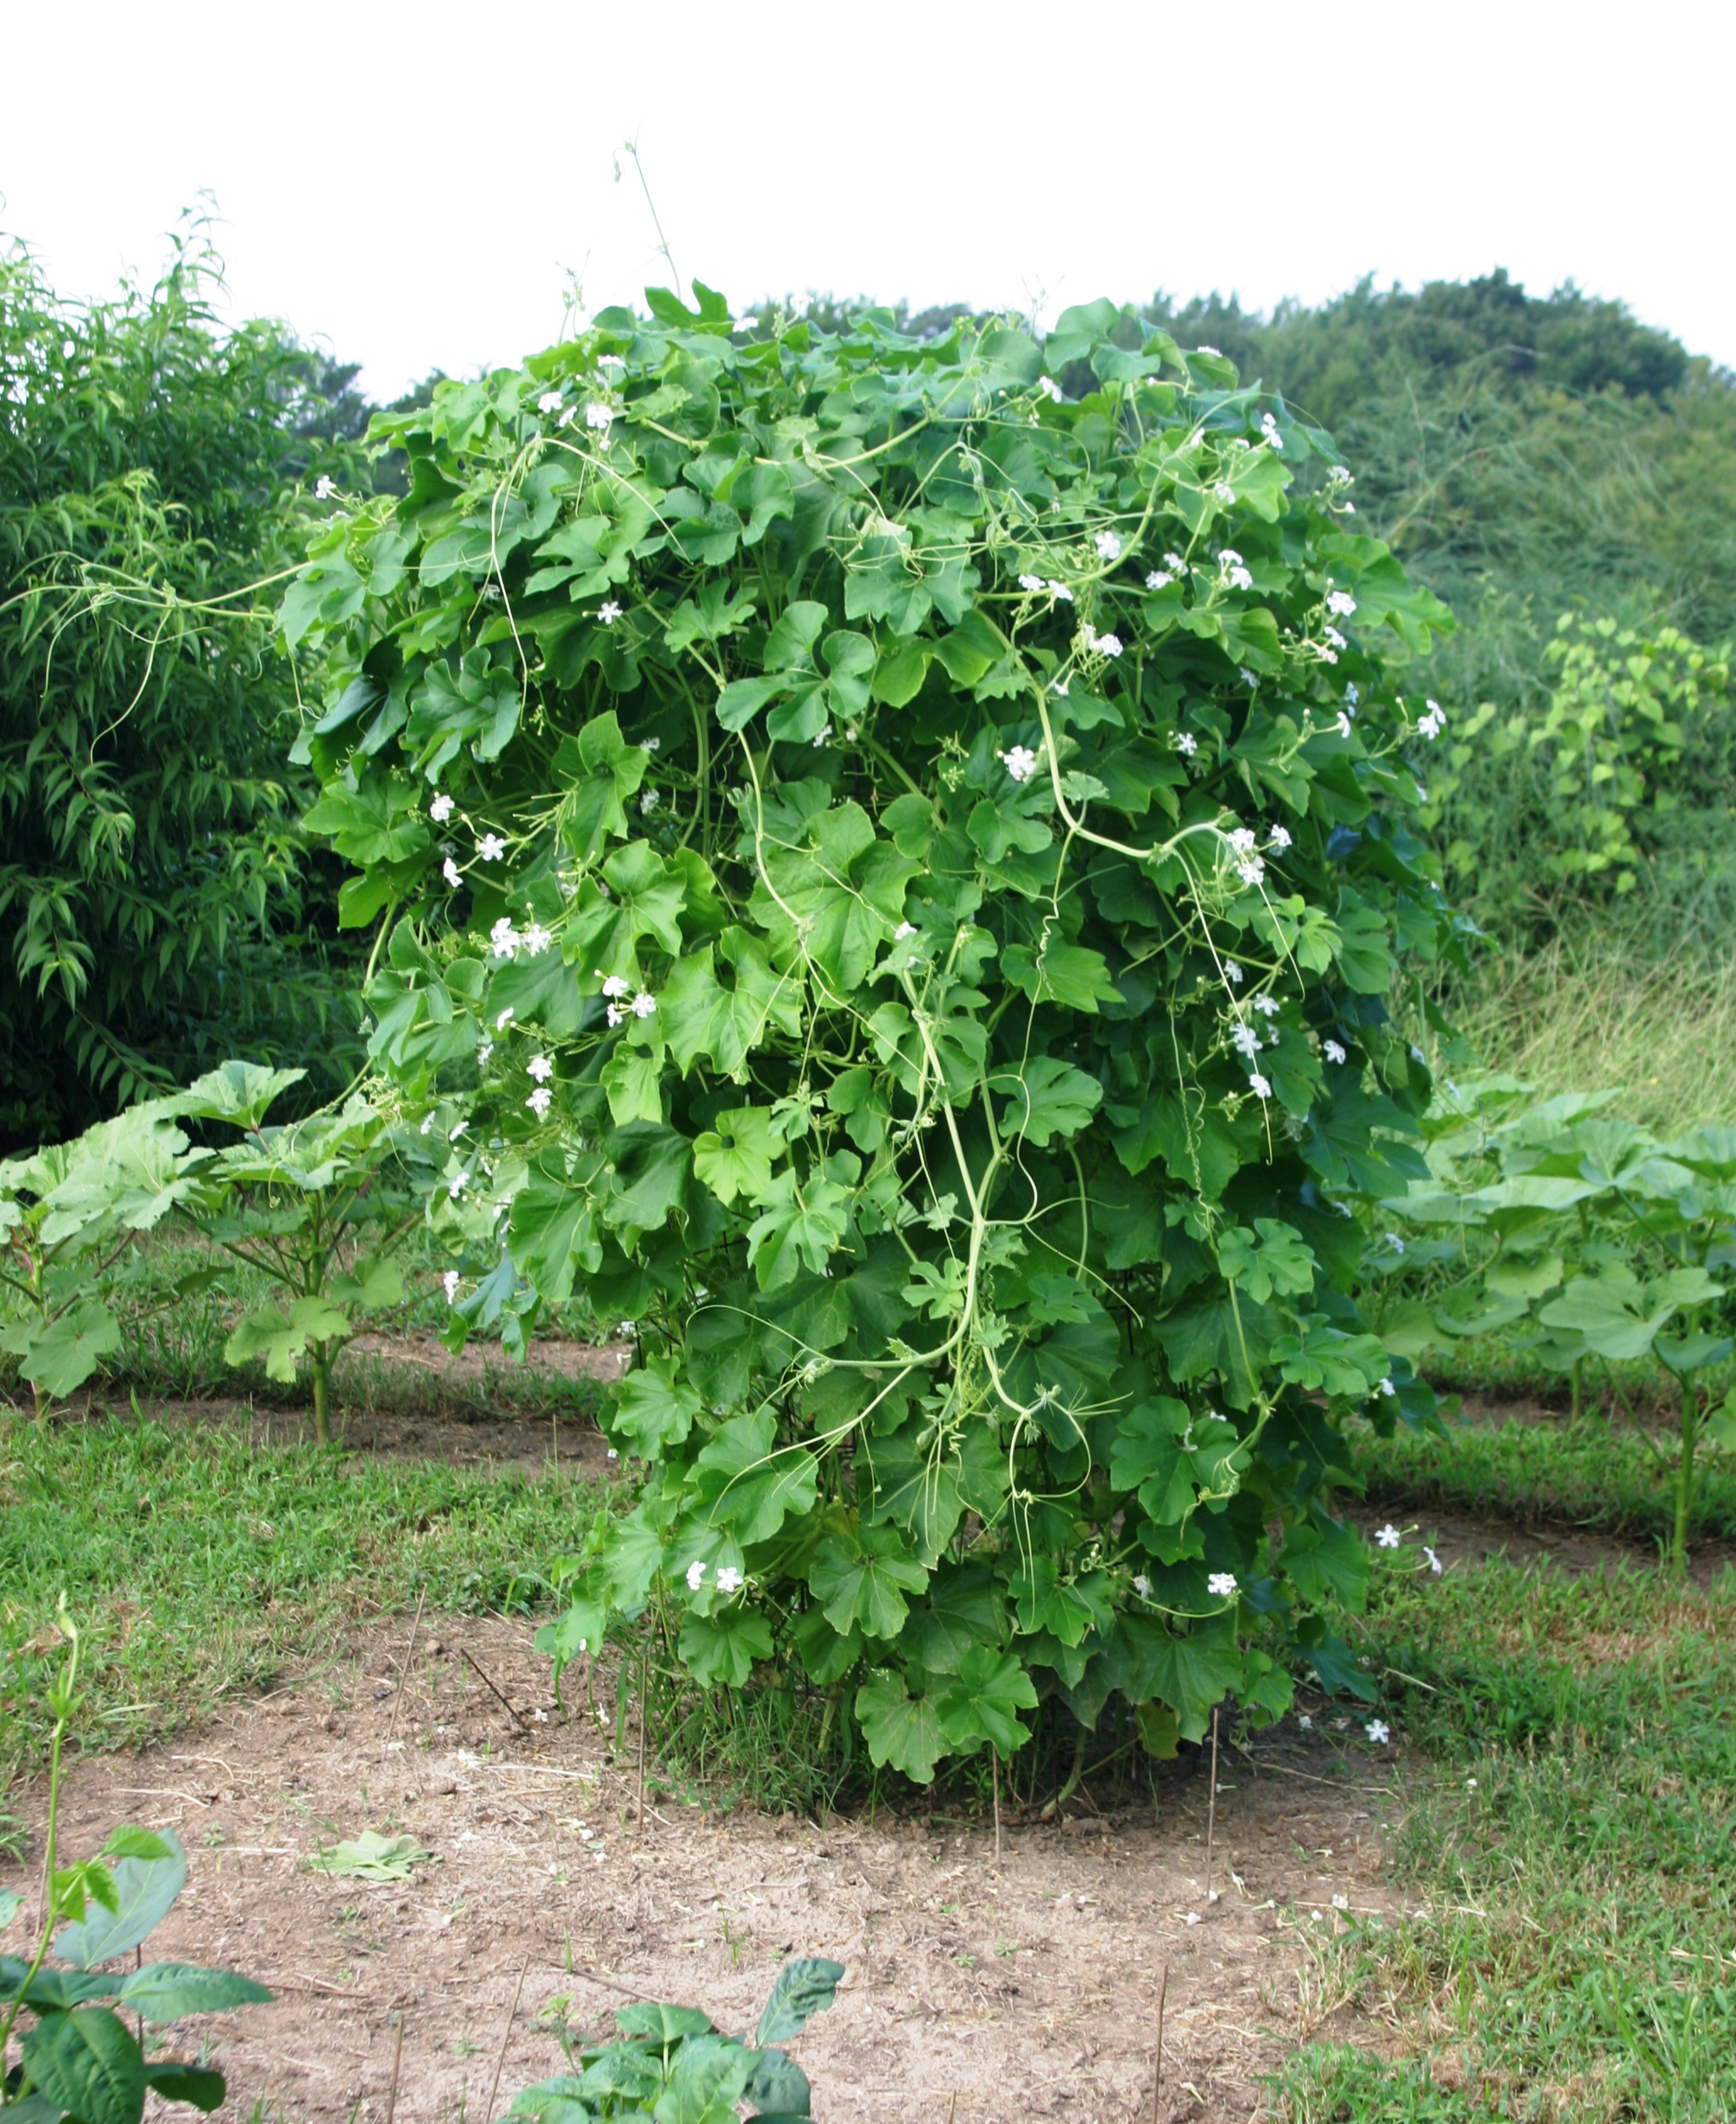
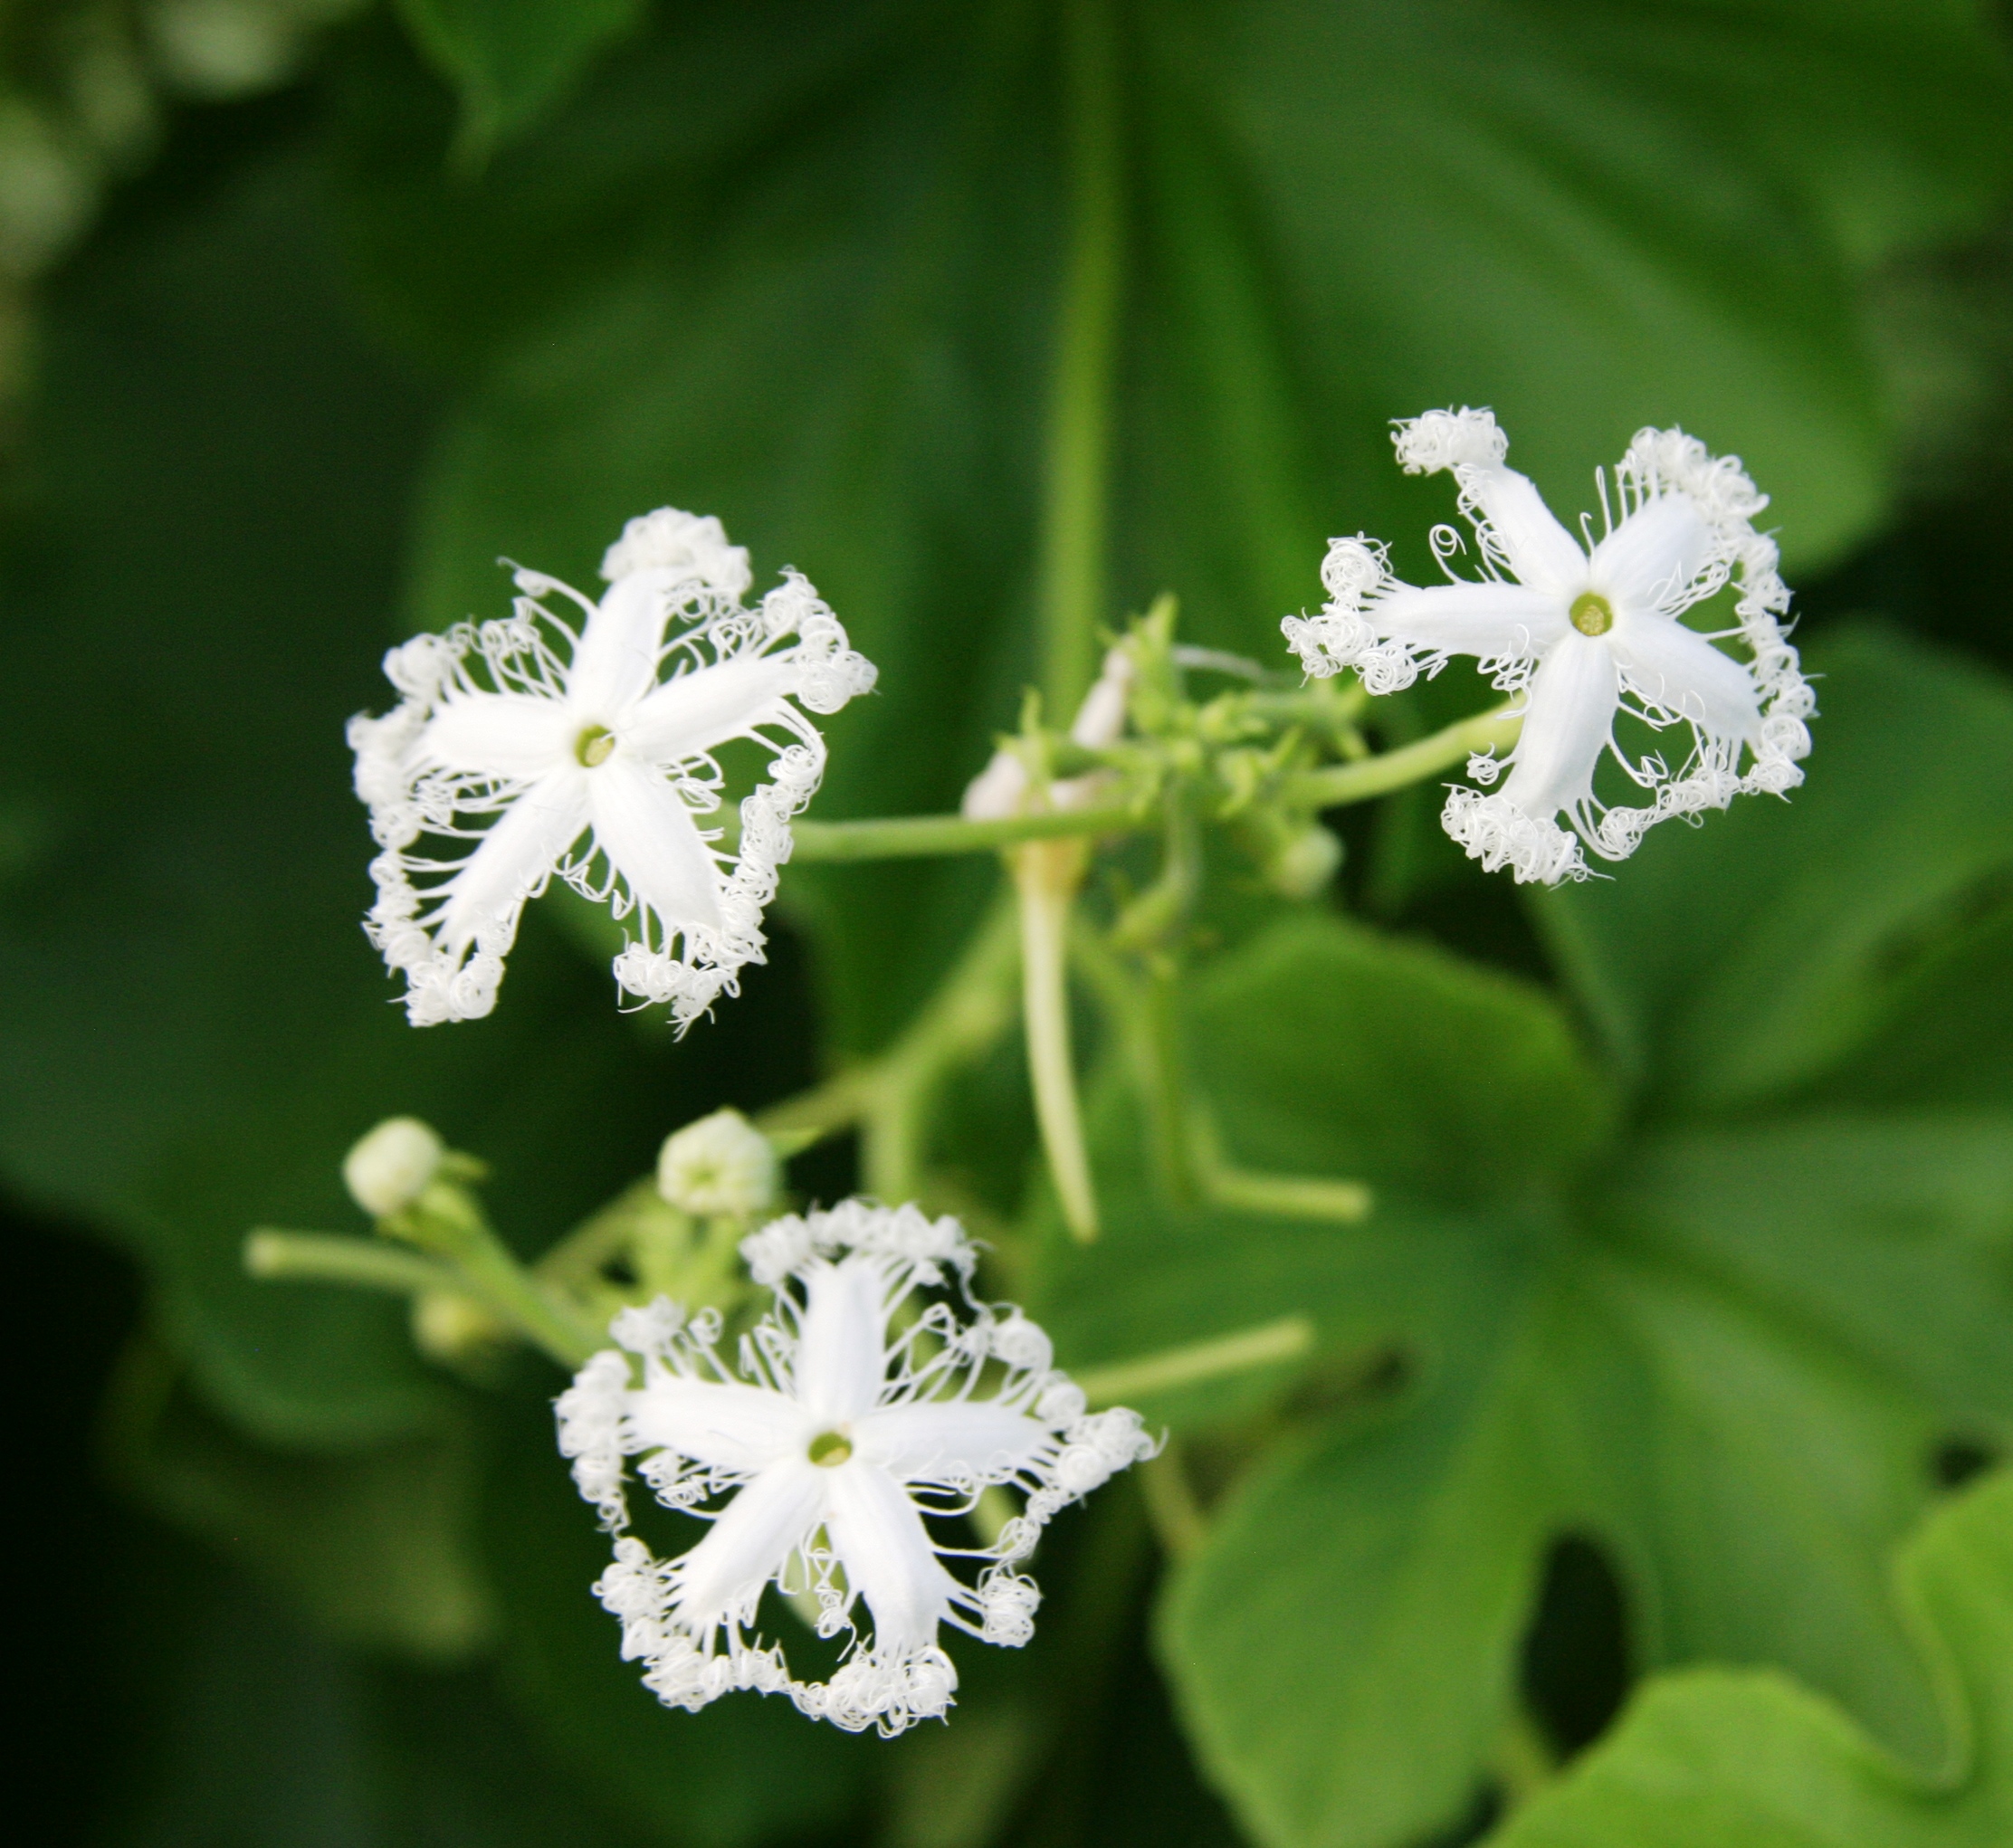
When I saw this vegetable in the Baker Creek catalog I was intrigued. It did not disappoint me.
The star shaped flowers smell like a very sweet honeysuckle.
The vines and leaves have an odd aroma. I’m still not certain if I dislike it but it is not off putting to me and I’ll grow this vegetable again next year. Yesterday, I harvested the first two pods. You can see from the photo how big the pods are. It is a vigorous climber. I’m making sure it doesn’t vine over to my okra.
I sliced the pods into ¼ inch rounds and sautéed them in Kerrygold butter with ½ teaspoon of taco seasoning. So good. I served them with tenderized pork cutlets that I pan fried. All in all a great dinner last night. Two thumbs up for this new vegetable. I hope you try this vegetable.
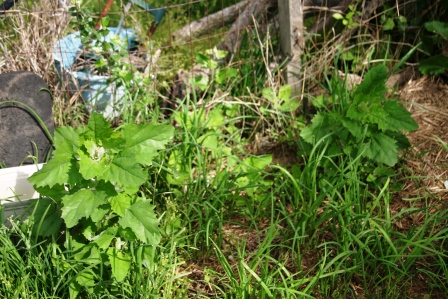
Volunteer plant in one of planters.More volunteer plants in my garden
The Spring “Weeds” are here! Many people run to get the herbicide to spray the heck out of those darn weeds. I run to get my foraging basket to gather as many as I can find to make a wonderful spring tonic. But that’s just me. It’s the way I roll.
There are so many beneficial weeds/greens growing at this time of year, it was difficult to choose one to discuss today. But choose I did. And my choice is lamb’s quarters (Chenopodium album). Chenopodium comes from the Greek language and means goosefoot hence the other names it is commonly known by – goosefoot and fatfoot. Album means white and refers to the white dusty underside of the leaves. This white dusting is full of minerals from the soil. A large patch of lamb’s quarters can look very dusty since the flower clusters have a white hue also.
This annual has a mild spinach flavor and is delicious prepared in the ways of spinach and Swiss chard. Tender leaves can be eaten raw in salads, steamed, sautéed, made into a pesto or even made into a delicious soup. Recipe will follow.
Considered a bothersome weed by some people here in America, lamb’s quarters is one of the few wild greens that has been analyzed for nutritional content. It is listed in the USDA National Nutrient Database, Data Type: SR Legacy Food Category: Vegetables and Vegetable Products FDC ID: 169244 NDB Number:11244. It is exceptionally high in calcium and Vitamins A and C. Lamb’s quarter packs a huge nutritional punch. In 100 grams there is 4.2 g protein, 1.2 g iron, 116,000 IU Vitamin A, 80 g Vitamin C and 309 g calcium. This plant is appreciated in Europe as a nutritious potherb. A traveler can even find bundles for sale at local farmers markets in France.
Harvesting lamb’s quarter is best done in spring and early summer when the leaves are most tender. You can harvest during the heat of the summer but limit yourself to taking the tender new leaves at the top of stalk. You may have to pick the leaves individually. The larger mature leaves have a higher concentration of oxalic acid that is why the young leaves are better suited to eat raw. Mature stalks can reach six feet tall.
All parts of lamb’s quarter can be used roots, leaves, flowers and seeds depending upon when and what reason you are harvesting. The roots contain saponin and when mashed can be used to make soap. The mashed roots can also be used as a tea infusion to aid elimination of toxins through a laxative effect. In addition to eating the leaves straight away, they can be dehydrated and ground to a powder for use in soups, smoothies or other dishes. The flowers can be used in similar ways to the leaves. The seeds can be prepared and used like it’s cousin quinoa.
Used as a tonic lamb’s quarter is a gentle detoxifier. The high chlorophyll content will bind to the toxins and will be eliminated. The spring tonic recipe I use will follow.
Lamb’s quarter is widely distributed in zones 4 to 11 in North America, Europe and Asia . It will grow wherever it can find a niche. I had a large plant grow in a crack in my concrete apron at the front of my shop where the overhead doors are. There is no need to cultivate as it is a prolific selfseeder. If you do want to cultivate try the Magneta Spreen Lamb’s quarter sold by Baker Creek Seeds, www.rareseeds.com.
For further research into this very useful green I highly recommend all of the books by Susan N. Gillmore – “The Backyard Herbalist”. She is a certified Master Herbalist and certified Master Mittleider Gardener. Her books include, “Medicinal Weeds”, “First Aid Kit Herbs”, Making Herbal Remedies and the Healer’s Art”, and “Culinary Herbs and Spices”. These hard copy, spiral bound books are an invaluable addition to your SHTF library. She can be reached at sue@LDSPrepper.com.
My spring tonic recipe –
½ cup packed fresh Lamb’s Quarter leaves
½ cup packed fresh Dandelion leaves.
16 ozs boiled filtered Water
1 Tbsp Bragg’s Apple Cider Vinegar
Raw Honey to taste
In a quart jar pack the lamb’s quarter and dandelion leaves. Add the boiled water. Steep for 15 minutes. Remove the leaves and give to your chickens or put in the compost. Add apple cider vinegar and honey to taste. Enjoy!
The soup recipe is on page 230 of “Forage, Harvest, Feast” by Marie Viljoen, Chelsea Green Publishing, Vermont 2018. This recipe is easily doubled.
8 ozs (227 g) Lamb’s Quarters
4 cups (1 L) Chicken Stock
Salt to taste, your choice Sea, Kosher, Pink Himalayan, Redmond Real Salt
2 Tbsp Lemon Juice
2 large uncooked Egg Yolks
Fresh ground Black Pepper to taste
2-4 poached Eggs (optional)
Bacon crumbles (optional)
Blanch leaves in boiling water for 1 minute. Strain leaves out and plunge into cold water. Squeeze and rough chop. Bring stock to a simmer. Taste and add salt if needed. Add lemon juice. Add leaves and cook for 3 minutes. Stir. Cool slightly and transfer soup to a blender. Pulse briefly. Transfer by to pot and heat. Do not boil. Whisk in egg yolks and season with salt and pepper. As soon as the soup is hot, it is ready to eat. Add pre-cooked poached eggs and bacon to individual bowls. This is excellent served with Irish Soda Bread and creamy butter. Enjoy!
My asparagus patch is a hot mess right now. I’m working it.
So far I have harvested about 3 pounds of asparagus from my garden. Asparagus from the garden is so good. I was able to clear out the dewberry vines so I can now actually see the tender stalks. I may allow the remaining stalks to go to seed to ensure I have asparagus next Spring. Back in 2011 I posted an asparagus soup that was just asparagus. In this version I have added potatoes for a bit more caloric content and flavor.
1 ½ pounds Asparagus, trim off the tough ends, cut in 1 inch pieces but set aside the tips
3 or 4 medium Potatoes, peeled and cubed
1 medium Onion, diced
2 ribs Celery, trimmed and chopped
2 tablespoons unsalted Butter
1 box (32 ozs) low sodium Chicken Broth or Home-made
1 cup Milk
1/2 cup Greek Yogurt
1 1/2 tablespoon All Purpose Flour or Wondra
Sea Salt or Kosher Salt to taste
1/4 teaspoon Dill Weed, dried
White Pepper to taste
Crispy Bacon, shredded Cheese or Chives to garnish
Melt butter in a medium size soup pot. Add onions and celery and sweat over medium high heat until onions are tender but not browned. Add chicken broth and asparagus pieces. Bring to a boil and then reduce heat to simmer for about 30 minutes.
While the asparagus mixture is cooking, in a separate pot cook the potato cubes until tender. Set potatoes aside. Process asparagus mixture in a blender, food processor or puree with an immersion stick blender until smooth. Return to soup pot when blended. In a small sauce pan heat the milk and whisk in the flour to make a smooth roux. Add a bit of the warm pureed asparagus soup to the roux. Blend well. Add the roux to the soup pot. Stir constantly until well blended.
Drain potatoes and add to soup pot. Add yogurt, salt, dill weed and pepper. Mix well. Add in asparagus tips and heat for about 10 minutes until soup is thickened and tips are slightly tender. Can serve with crusty bread and creamy butter.
Hello guys! Just wanted to let everyone know that there is someone else using OkieRanchWife on Pinterest. I have never been on that site and have been using my handle since 2011. I guess this comes with the territory of being on the internet, SIGH! Okay. I did just sign up to Pinterest to get my @okieranchwife on there but I will not be pinning or posting anything.
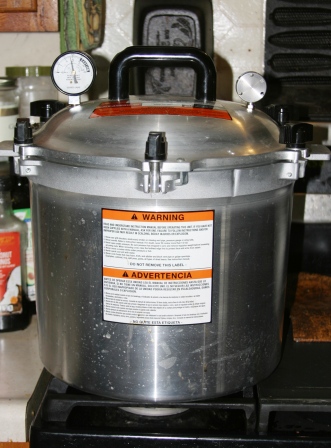
I have been pressure canning meat protein like a crazed woman. This is my 921 All American canner with ugly chicken processing. I have done chicken, bone in legs and thighs and deboned breasts, ground beef, ground pork sausage, and pulled pork butt. I have had an All American pressure canner for about three years. It was gift from a very good friend. I was afraid of it. It sat in my dining room with an accusatory attitude, like “come on, go big or go home”! With the state of the food industry and grocery food that you buy now and preserve will be a saving and money in your pocket. I don’t believe the cost of food will come down anytime soon. So I went big. I started right in on meat. Totally by passed all the veg recipes. I want shelf stable meat protein in my pantry. I have been hot water bath canning acidic foods for many years and am very comfortable with that process. Now I am confident with my pressure canner.
Since I am a newbie to pressure canning I would not presume to give directions how to do it. However, there are several YouTube channels that were invaluable to me. They are Late Bloomer Homestead (Kaye Kittrel was learning how to use her new canners) , Sutton’s Daze and North Texas Vegetable Gardening and Cooking. I also used the recipe book that came with my All American and a couple canning books that I own.
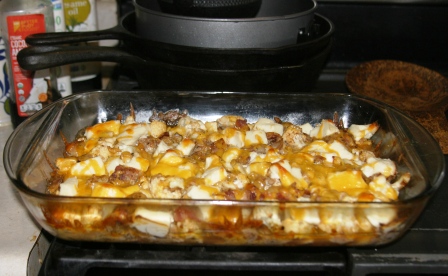
I hope you enjoy this chicken casserole that is low carb, high fat, KETO friendly recipe. And you probably have the ingredients in kitchen already!
Extra Virgin Olive Oil Spray or Coconut Oil Spray
1 quart canning jar Ugly Chicken (I pack 2 bone in legs and thighs in a quart jar) You can also use a pre-cooked deli chicken.
1 small head Cauliflower, broken into small florets and stems chopped
8 ozs Cream Cheese, sliced into cubes
12 ozs Bacon , cooked, chopped and drained (I love bacon)
8 ozs Extra Sharp Cheddar Cheese , shredded and divided
2 Tsp Sweet Paprika
Sea Salt and Black Pepper to taste
Preheat the oven to 400 F.
Spray the casserole dish with olive oil or coconut oil. A casserole dish measuring 13 x 9 inches will accommodate this recipe. Shred the chicken meat off the bones. Save the bones in the freezer for homemade bone broth.
Place the cauliflower florets in the casserole dish. Add shredded chicken, bacon and one half of the shredded cheddar cheese to the casserole dish and mix with the cauliflower. Sprinkle the mix with paprika, salt and pepper. Top with the cubed cream cheese. Sprinkle remaining shredded cheddar over top of cream cheese.
Bake, uncovered, for about 45 to 50 minutes, until the cauliflower is tender and cooked.